


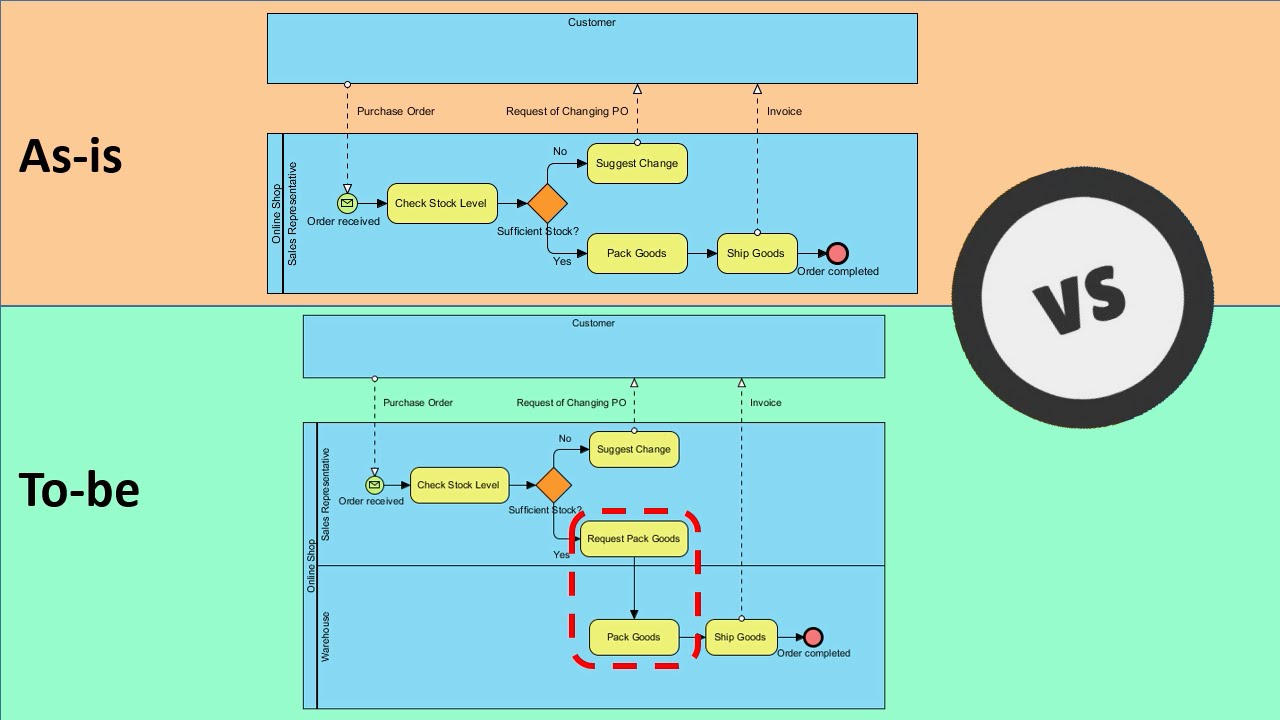
In the realm of Business Process Management (BPM), the ability to clearly distinguish between the current reality and the desired future state is critical for successful digital transformation. This tutorial explores the fundamental concepts of As-Is and To-Be process analysis using Business Process Model and Notation (BPMN). By visualizing these workflows, organizations can identify inefficiencies, document working procedures, and validate improvements before implementation.
Understanding the Core Concepts
Process modeling is not just about drawing boxes and arrows; it is about capturing the logic of an organization. The framework presented here utilizes BPMN to create “living documentation” that explains how tasks are performed, identifies roles, and specifies inputs and outputs.
The As-Is Analysis: Capturing Reality
The “As-Is” model represents the current state of operations. It is the baseline against which all future improvements are measured. Its primary purpose is to document the process exactly as it exists today, often revealing hidden complexities that stakeholders may not have noticed.
- Documentation Focus: The goal is accuracy, not optimization. If a process is inefficient, the As-Is model must reflect that inefficiency.
- Key Activities:
- Identify Bottlenecks: Locate where work piles up or slows down.
- Find Redundancies: Spot duplicate tasks or unnecessary approvals.
- Gather Metrics: Collect data on cycle times, costs, and error rates.
The To-Be Design: Envisioning the Future
Once the As-Is process is understood, the “To-Be” model is designed to address the issues identified. This is a forward-looking model that represents the optimized workflow after improvements have been implemented.
- Optimization Focus: The goal is efficiency and effectiveness. The model should reflect best practices and leaner workflows.
- Key Activities:
- Design Optimized Processes: Remove bottlenecks and automate manual steps.
- Scenario Modeling: Model different alternatives to see which yields the best results.
- Validation: Use simulation to ensure the new design works before rolling it out.
Visualizing the Difference: A Case Study
Let us examine a practical scenario involving an Online Shop and its interaction with a Warehouse. By comparing the As-Is and To-Be models side-by-side, we can see exactly how the architecture of the process changes.
1. The As-Is Scenario: The “All-in-One” Challenge
In the initial state, the process is contained entirely within the Online Shop lane. The workflow looks like this:
- The Sales Representative receives a Purchase Order.
- The representative manually Checks Stock Level.
- A decision diamond checks: Sufficient Stock?
- If “No”, the rep suggests a change.
- If “Yes”, the rep manually proceeds to Pack Goods and then Ship Goods.
Analysis: In this model, the Sales Representative is burdened with physical logistics tasks (packing) that are typically outside their primary scope. This creates a bottleneck and increases the risk of error.
2. The To-Be Scenario: Specialized Roles and Handoffs
In the optimized state, the process is redesigned to leverage the correct roles. The diagram introduces a new swimlane for the Warehouse.
- The Sales Representative still checks stock levels.
- If stock is sufficient, the representative does not pack the item. Instead, they trigger a new task: Request Pack Goods.
- A dashed line (message flow) indicates a handoff to the Warehouse lane.
- The Warehouse staff performs the Pack Goods task.
- The process concludes with Ship Goods.
Analysis: This separation of duties is a classic improvement. It ensures that sales staff focus on customer interaction and order management, while warehouse staff focus on logistics and fulfillment.
Step-by-Step Modeling Guide
To replicate this modeling approach using tools like Visual Paradigm, follow these steps to ensure high-quality documentation.
Step 1: Define the Scope and Participants
Begin by identifying the Pools (the organization) and Swimlanes (departments or roles). In our example, we need to ensure the “Warehouse” lane is explicitly defined to allow for the To-Be separation of duties.
Step 2: Map the Current State (As-Is)
Draw the workflow exactly as it happens. Use standard BPMN symbols:
- Start Event: The receipt of the Purchase Order.
- Task: “Check Stock Level”.
- Gateway: A diamond shape for the “Sufficient Stock?” decision.
- End Event: “Order Completed”.
Step 3: Analyze and Identify Pain Points
Review the As-Is diagram. Ask critical questions:
“Why is the Sales Rep packing boxes?”
“Can we automate the handoff between Sales and Warehouse?”
Identify that the manual packing by Sales is the inefficiency to be addressed.
Step 4: Design the Future State (To-Be)
Redraw the process to fix the identified issues.
1. Split the workflow across swimlanes.
2. Replace the manual “Pack Goods” task in the Sales lane with a “Request Pack Goods” task.
3. Add the “Pack Goods” task in the Warehouse lane.
4. Ensure the Message Flow (dashed line) connects the request to the fulfillment.
Step 5: Validate and Maintain
Visual Paradigm and similar tools allow you to maintain both versions side-by-side. This facilitates easy comparison. Ensure that your diagrams include detailed working procedures, linking to relevant policies and guidelines for every task.
Conclusion
By rigorously documenting the As-Is process and thoughtfully designing the To-Be state, organizations can transition from reactive problem-solving to proactive process improvement. These models serve as a blueprint for change, ensuring that roles are clearly defined and that the path to operational excellence is clear.