Understanding the Workflow
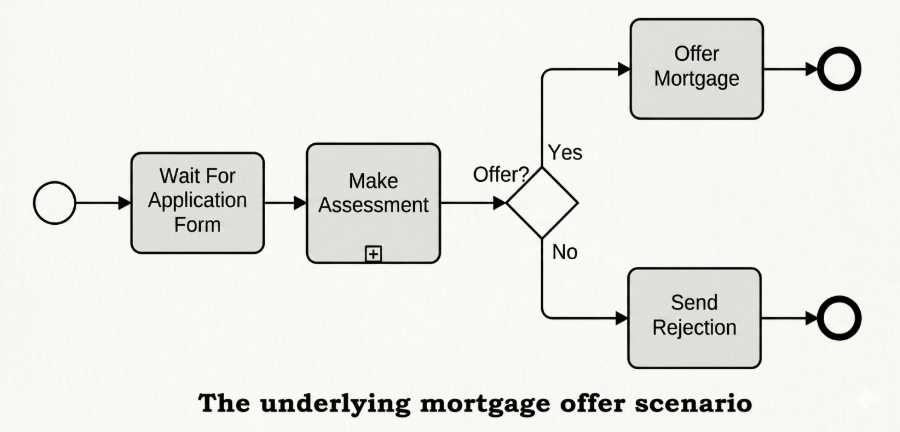
Welcome to this tutorial session. Today, we are going to deconstruct a specific business scenario: The underlying mortgage offer scenario. Whether you are new to process modeling or looking to refine your skills in Visual Paradigm, understanding how to map out financial workflows is essential for clear communication between developers and business stakeholders.
Let’s walk through this diagram together, not just as a collection of shapes, but as a story of a customer’s journey from submission to final resolution.
1. The Starting Point: Waiting for Input
Every process needs a trigger. In our diagram, the workflow begins at the circle on the far left. This represents the Start Event.
Immediately following this is the first task: Wait For Application Form. Notice that this is a simple rectangular box with rounded corners. In BPMN terms, this is a standard Task. It signifies that the bank or lending institution is now in a holding pattern, waiting for the critical piece of information—the application—to arrive before any action can be taken.
2. The Core Activity: Making an Assessment
Once the form is received, the flow moves to the next step: Make Assessment. You will notice a small plus sign (+) in the bottom corner of this rectangle. This is a crucial detail often used in tools like Visual Paradigm to indicate that this task is complex.
This symbol tells us that “Making an Assessment” isn’t a single click; it is likely a sub-process involving credit checks, income verification, and risk analysis. However, within the scope of this high-level view, we treat it as one cohesive unit of work.
3. The Decision Gate: To Offer or Not?
Here is where the logic of the process comes into play. After the assessment is complete, the arrow leads to a diamond shape labeled Offer?. This is a Gateway, specifically an Exclusive Gateway.
In process modeling, diamonds represent points where the path splits based on a condition. Here, the system must decide if the applicant qualifies. There are two distinct paths forward:
- The “Yes” Path: If the assessment is positive, the flow follows the line labeled “Yes.”
- The “No” Path: If the assessment fails, the flow follows the line labeled “No.”
This structure ensures that the process doesn’t get stuck in ambiguity; every case must result in either an approval or a rejection.
4. Resolving the Outcome
Depending on the decision made at the gateway, the process concludes in one of two ways:
- Success Scenario: Following the “Yes” branch, the team performs the task Offer Mortgage. Once this document is sent to the client, the process reaches a thick-bordered circle. This is the End Event, signaling that the lifecycle of this specific transaction is successfully closed.
- Rejection Scenario: Conversely, if the answer was “No,” the workflow directs the user to Send Rejection. Again, once this notification is dispatched, the process hits its End Event. The transaction is closed, even though the outcome wasn’t what the customer hoped for.
Key Takeaways
To wrap up this session, let’s review what we’ve learned about modeling this mortgage scenario:
- Linear Progression: Processes typically move from a Start Event through tasks and decisions to an End Event.
- Complex Tasks: Use the Sub-Process indicator (the plus sign) to denote tasks that require further breakdown later.
- Exclusive Gateways: Diamonds are vital for introducing logic and branching paths based on conditions (Yes/No).
- Closure: Every logical path in a diagram should ideally lead to an End Event to ensure the process is fully defined.
By breaking down diagrams like this, you can see how complex real-world scenarios are translated into visual models that drive efficiency and clarity.