Welcome to this tutorial on business process modeling. In the manufacturing and engineering sectors, clarity is currency. A well-defined workflow ensures that every stakeholder, from the initial customer to the final delivery team, understands their role and responsibilities. Today, we will walk through a comprehensive product development process that moves from a conceptual request to the final delivery of goods.
Phase 1: Initiation and Conceptual Design
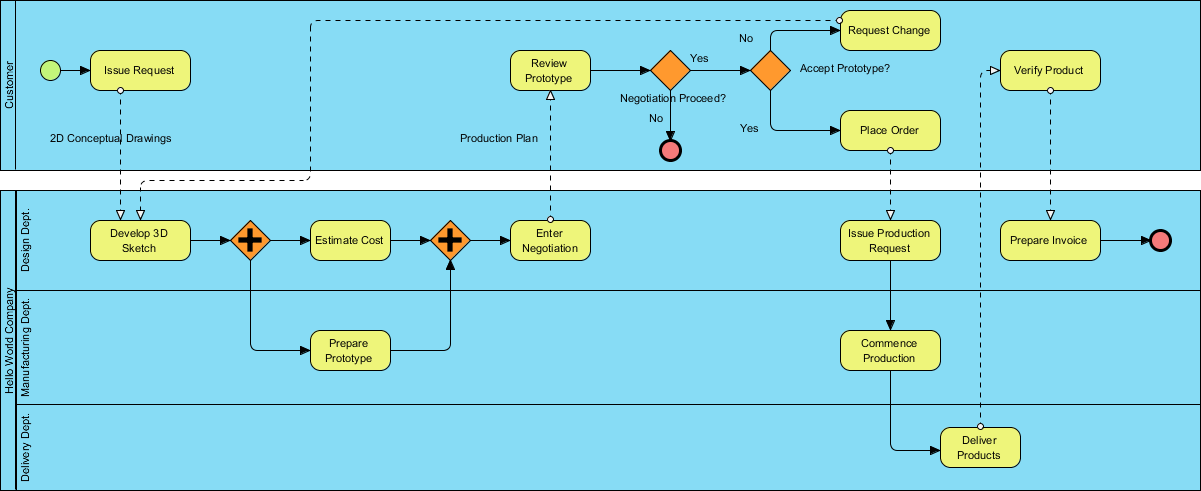
The process always begins with the Customer. The journey starts with the “Issue Request” step, where the client provides 2D Conceptual Drawings. These initial sketches serve as the blueprint for the entire project.
Upon receiving these drawings, the Design Department takes the lead. Their first task is to “Develop 3D Sketch.” This transformation from 2D to 3D is crucial as it allows the design team to visualize the product more accurately before moving to physical construction.
Phase 2: Parallel Execution – Costing and Prototyping
Once the 3D sketch is complete, the workflow enters a critical phase where multiple tasks occur simultaneously. We see a parallel gateway (represented by the orange box with a plus sign), indicating that the process splits into two concurrent paths:
- Cost Estimation: The Design Department proceeds to “Estimate Cost.” This ensures that the financial feasibility of the project is analyzed early.
- Prototype Preparation: Simultaneously, the Manufacturing Department is tasked to “Prepare Prototype.” This allows the physical model to be built while the financials are being calculated.
These two paths eventually converge. The “Estimate Cost” and “Prepare Prototype” steps must both be completed before the process can move forward to “Enter Negotiation.” This synchronization ensures that when negotiations begin, the customer has both a tangible prototype to inspect and a concrete cost estimate to discuss.
Phase 3: The Negotiation and Review Loop
This is the most interactive phase of the workflow, involving heavy feedback from the Customer. The customer reviews the prototype provided by the manufacturing team. Here, two critical decision points arise:
- Negotiation Proceed? The customer decides if the cost and proposal are viable. If the answer is “No,” the process terminates (indicated by the red circle), meaning the project is abandoned at this stage.
- Accept Prototype? If the negotiation proceeds, the customer must decide if the prototype meets their standards. If the prototype is not accepted, a “Request Change” is issued, which loops the process back to the beginning to refine the 3D sketch and restart the cycle.
Only when the customer answers “Yes” to both negotiation and prototype acceptance is the order officially placed via the “Place Order” step.
Phase 4: Production and Final Delivery
With the order placed, the workflow shifts into the execution phase. The Design Department issues a formal “Production Request,” signaling the Manufacturing Department to “Commence Production.” Once the products are manufactured, the Delivery Department steps in to “Deliver Products” to the customer.
The process concludes with verification and billing. The customer verifies the product, and the Design Department prepares the final invoice. This final step closes the loop, ensuring payment is processed only after the product has been successfully delivered and verified.
Conclusion
By following this structured workflow, companies can minimize errors and ensure that customer expectations are met at every stage. The parallel processing of costing and prototyping saves time, while the rigorous negotiation loop ensures that no money is spent on production until the customer is fully satisfied with the design and the price.