


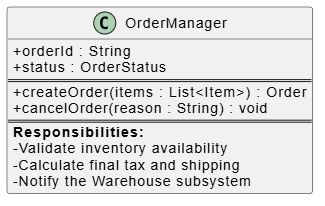
In the world of software engineering, the standard UML class diagram is a powerful tool, but it is not always sufficient to capture the full depth of a system’s design logic. While attributes and operations define what a class does, they often fail to explain why it exists or the specific design contracts it upholds. This tutorial explores how to extend the standard UML notation to include a dedicated “Responsibilities” compartment. We will use the OrderManager class as our case study to demonstrate how this technique enhances documentation clarity and facilitates better code reviews.
The Challenge: Bridging the Gap Between Code and Design
Standard UML notation typically restricts a class shape to three primary compartments: the class name, the attributes (data), and the operations (methods). However, complex enterprise systems often require more explicit documentation. Developers frequently need to specify the business rules, validation logic, or system interactions that are not immediately obvious from method signatures alone.
By introducing a fourth, custom compartment, we can explicitly document the responsibilities of a class. This serves as a “design contract,” ensuring that every developer reading the diagram understands the specific duties assigned to that component, such as validating data or coordinating with external subsystems.
Case Study: The OrderManager Class
Consider the OrderManager class. In a standard diagram, you might see operations like createOrder and cancelOrder. But what happens inside those methods? To ensure clarity during code reviews and design discussions, we will expand this class to include a distinct section dedicated to its core responsibilities.
Visualizing the Extended Structure
The resulting class diagram will feature a custom section listing the following critical duties:
- Validate inventory availability – Ensuring the system checks stock levels before finalizing an order.
- Calculate final tax and shipping – Handling the financial computations required for the transaction.
- Notify the Warehouse subsystem – Managing the communication trigger that initiates the physical fulfillment process.
Step-by-Step Implementation in Visual Paradigm
Visual Paradigm offers robust support for extending UML notation. Follow these steps to add a custom responsibilities compartment to your class model.
Step 1: Create the Base Class
Begin by creating a new class diagram. Add a class named OrderManager. Ensure you populate the standard compartments with your existing attributes (e.g., orderId: String) and operations (e.g., +createOrder(...)) as required by your system design.
Step 2: Enable Custom Compartments
By default, UML tools limit the number of sections visible. To add a fourth section:
- Right-click on the
OrderManagerclass shape in your diagram. - Select Format > Show/Hide Compartments from the context menu.
- Alternatively, you can access the Property Panel and look for the “Compartments” or “Show” options to enable additional sections.
Step 3: Define the Content
Once the extra compartment is visible, you can populate it with your design logic. You have two main options depending on your version of the software:
- Manual Text Entry: If your version supports custom compartment content, simply type the responsibilities directly into the new section. Use bold headers (like Responsibilities:) and bullet points to ensure readability.
- Tagged Values or Notes: If the compartment shape is rigid, you may attach a Note or use Tagged Values to define these responsibilities programmatically, though the visual compartment method is often preferred for high-level architectural diagrams.
Step 4: Formatting for Clarity
To make the diagram professional and easy to read:
- Ensure the text is concise. Avoid writing full sentences; use action-oriented phrases.
- Use bolding to highlight key actions (e.g., Validate, Calculate).
- Use bullet points to separate distinct responsibilities.
Key Benefits of This Approach
Extending the standard notation to include a responsibilities compartment offers significant advantages for software teams:
- Explicit Design Contracts: It forces the architect to explicitly define what the class must do, preventing ambiguity during implementation.
- Enhanced Code Reviews: Reviewers can quickly scan the diagram to verify that the implementation aligns with the documented design intentions.
- Flexibility: Visual Paradigm’s ability to customize class shapes allows you to adapt the notation to your team’s specific documentation needs, ensuring that critical design decisions are never lost in the code.
By mastering these advanced modeling features, you move beyond simple diagramming to creating living documentation that truly supports your software architecture.
Related posts:
 Mastering the 14 UML Diagram Types: A Comprehensive Tutorial for Software Architects
 Is UML Dead? How Diagram-as-Code and AI Revived It for Agile Teams in 2026
 Introduction to Conversational Modeling with VP AI Chatbot
 Mastering the UML Class Box: A Comprehensive Guide to Software Architecture and Modeling