


Introduction to Process Modeling
In the world of business operations, clarity is king. Whether you are a manager looking to streamline workflows or an analyst mapping out procedures, understanding the flow of information is crucial. One of the most effective ways to visualize this is through Business Process Model and Notation (BPMN), often used in tools like Visual Paradigm.
Today, we will walk through a classic example found in almost every organization: the Employee Expense Claim Process. By breaking down this diagram step-by-step, we can see how different roles interact to ensure money is handled correctly.
The Swimlanes: Who Does What?
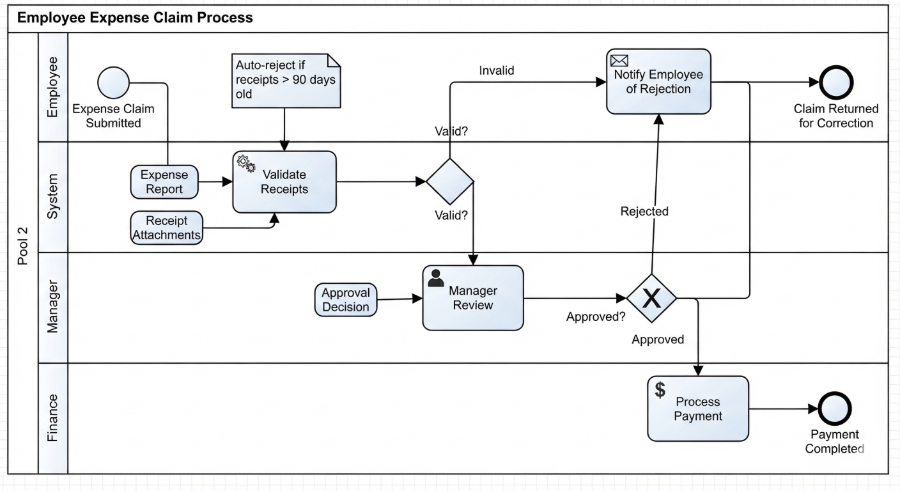
Before diving into the actions, let’s look at the structure. The diagram is divided into horizontal strips called “swimlanes.” These represent the specific actors responsible for each task. In this scenario, we have four distinct roles:
- Employee: The initiator of the process.
- System: Automated rules and validations.
- Manager: The human approver.
- Finance: The department handling the actual payment.
This separation ensures that no task is ambiguous; everyone knows exactly where their responsibility begins and ends.
Step 1: Submission and Validation
The journey begins with the Employee. They submit an expense claim, which includes an expense report and receipt attachments. You’ll notice these inputs feed directly into the System lane.
Here, the System takes charge with a task labeled Validate Receipts. This is a great example of automation. Instead of a human manually checking dates immediately, the system performs a logical check. It looks at the age of the receipts. If they are older than 90 days, there is a rule set up to auto-reject them. This prevents old, invalid claims from cluttering the workflow.
Step 2: The Decision Point
After validation, the process hits a diamond-shaped symbol—a gateway. This represents a decision point. The question here is simple: Valid?
If the answer is Invalid, the flow moves upward. The System triggers an event to notify the employee of the rejection. This notification acts as a signal for the Employee to correct their submission and return it. Notice the circle with a thick border on the far right—this indicates the end of the loop for that specific attempt.
Step 3: Managerial Review
If the receipts pass the system’s check, the path moves down to the Manager lane. Here, the human element comes back into play. The manager performs a Manager Review.
This review is followed by another gateway asking: Approved?
- Rejected: If the manager says no, the process loops back to the top to notify the employee, similar to the system rejection.
- Approved: If the manager signs off, the process moves forward to the final stage.
Step 4: Payment and Completion
The final active task belongs to the Finance department. Once approved, Finance processes the payment. Finally, the process reaches its destination: a double-bordered circle indicating that the Payment is Completed.
Summary of Key Learnings
By visualizing this process, we gain several insights into efficient business modeling:
- Automation First: The system handles repetitive checks (like receipt age) before humans get involved, saving time.
- Clear Accountability: Swimlanes make it obvious who is responsible for rejection versus payment.
- Feedback Loops: The diagram clearly shows what happens when things go wrong (rejection), ensuring the process doesn’t just stop but guides the user to fix errors.
Understanding these flows is essential for anyone looking to optimize organizational efficiency.
Related posts:
 Mastering BPMN Loop Markers: A Practical Guide to Email Management
 Mastering BPMN Cross-Functional Flows: A Nobel Prize Process Analysis
 Mastering BPMN 2.0: Orchestrating Multi-Party Order Fulfillment with Choreography Diagrams
 Mastering BPMN Swimlanes: A Deep Dive into the Supplier Qualification Process