


In the world of Business Process Model and Notation (BPMN), the “Task” is the fundamental building block of any workflow. It represents a specific unit of work that needs to be performed. However, a generic rectangle is often not enough to convey the precise nature of that work. To model complex business logic effectively, one must understand the distinctions between User Tasks, Send Tasks, and Receive Tasks, and how to utilize tooling like Visual Paradigm (VP) to render these nuances accurately.
This tutorial provides a comprehensive walkthrough of the “Order Fulfillment” scenario. We will deconstruct a linear process flow, explaining the architectural logic behind each step and demonstrating how to implement these specific BPMN concepts using Visual Paradigm.
Understanding the Scenario: From Order to Delivery
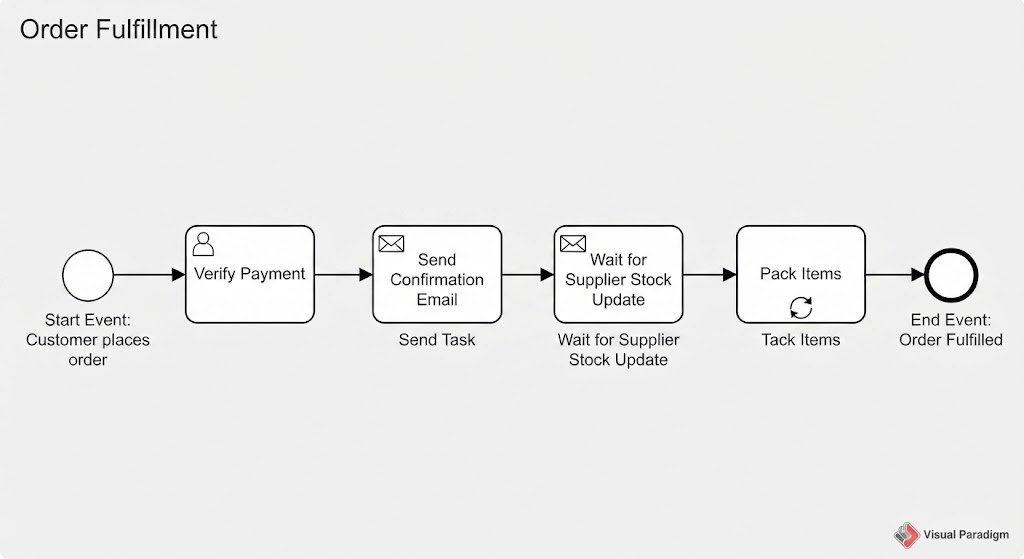
The process depicted in the diagram represents a classic e-commerce fulfillment lifecycle. It moves from a manual trigger (the customer) through a series of automated and human interactions, and finally to a physical fulfillment action. The diagram is constructed using standard BPMN events and specialized tasks to ensure clarity for both business stakeholders and developers.
Let’s break down the flow step-by-step:
- Start Event: The process is initiated by an external trigger.
- User Task: A manual verification step performed by a human agent.
- Send Task: An automated system action that pushes data to an external entity.
- Receive Task: A blocking action where the process waits for an external message.
- Task with Loop Marker: A physical action that may repeat for individual items.
- End Event: The successful completion of the process.
Step 1: The Trigger (Start Event)
Every BPMN diagram requires a starting point. In this scenario, the process begins when a Start Event occurs. Visually, this is represented by a thin-lined circle.
- Logic: The event is “Customer places order.” This is a Message Start Event in strict BPMN terms, as it is triggered by an incoming message from outside the system (the customer). However, in high-level modeling, it is often simply labeled as a generic Start Event.
- Implementation in VP: Drag the Start Event shape from the BPMN Shape Repository onto your canvas. Double-click to label it clearly.
Step 2: The Human Element (User Task)
Not all tasks are automated. The second step, “Verify Payment”, is a User Task.
A User Task signifies work that is performed by a human actor. It implies that a person must log into a system to check a database, verify a credit card, or confirm an address.
Visualizing the User Task
In Visual Paradigm, while a generic Task is a rounded rectangle, a User Task has a specific identifier to distinguish it from system tasks.
- Select the generic Task shape.
- Click the Resource Catalog icon (the small arrow) at the top-right of the shape.
- Select Change Type and choose User Task.
Result: Visual Paradigm will automatically add a small “person” or “user” icon to the top-left of the rectangle. This visual cue instantly tells the viewer that this step requires human intervention.
Step 3: System-to-External Communication (Send Task)
Once the payment is verified, the system must communicate with the customer. The step “Send Confirmation Email” is modeled as a Send Task.
A Send Task represents an activity where the system actively sends a message to an external participant (like an email server or an SMS gateway). Unlike a standard Task, this implies the system is the active sender.
Visualizing the Send Task
To model this in Visual Paradigm:
- Select the task representing the email action.
- Use the Resource Catalog to change the type to Send Task.
Result: The task will gain an “envelope” or “paper plane” icon at the top-left. This signifies that the process flow is pushing information out, rather than waiting for it.
Step 4: The Blocking Wait (Receive Task)
The next step, “Wait for Supplier Stock Update”, is a critical concept in process modeling known as a Receive Task.
This task represents a pause in the process. The system cannot move forward until an external message is received (in this case, confirmation that stock is available). It is the inverse of a Send Task.
Visualizing the Receive Task
In Visual Paradigm, you follow the same procedure as the Send Task:
- Select the task.
- Open the Resource Catalog.
- Change the type to Receive Task.
Result: The task will display a “mail” or “incoming envelope” icon. This visual distinction is vital because it tells developers that this process step requires an event listener or a message queue to handle the incoming response.
Step 5: Handling Repetition (Loop Marker)
The final operational step is “Pack Items”. While this is a physical task, the diagram introduces a complexity: the process might need to repeat.
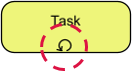
If a customer orders three different items, the packing process must repeat three times. In BPMN, we do not draw three separate boxes. Instead, we use a Loop Marker.
Adding Markers in Visual Paradigm
To add this standard notation:
- Select the “Pack Items” task.
- Open the Format Panel (usually on the right side).
- Locate the BPMN tab or Shape Properties.
- Check the box for Loop.
Result: Visual Paradigm will render a circular arrow icon at the bottom of the task. This indicates to the viewer that the task is iterative and may occur multiple times based on the input data.
Conclusion
By adhering to the rule of atomicity and utilizing specialized types like Send, Receive, and User tasks, you significantly reduce ambiguity in your diagrams. A well-modeled task tells the viewer exactly who is doing the work (User), what triggers it (Start Event), and if it repeats (Loop Marker).
Tools like Visual Paradigm streamline this adherence to standards. By mastering these basics, you ensure that your process models serve as powerful tools for analysis, allowing for accurate automation and clear communication across technical and business teams.
Related posts:
 Mastering Business Processes: The Employee Expense Claim Flow
 Mastering Business Process Modeling: The Nobel Prize Nomination Workflow in BPMN
 Mastering Iterative Processes: A Deep Dive into Loop Markers in Visual Paradigm
 Mastering BPMN: A Comprehensive Guide to Process Modeling Elements & Best Practices