In the world of Business Process Model and Notation (BPMN), clarity is king. As business workflows grow in complexity, drawing every single step on a single canvas results in a “spaghetti diagram” that is impossible to read or maintain. The solution to this chaos is hierarchical process development.
This tutorial explores the mechanics of Sub-Processes, the fundamental building blocks for managing complexity in BPMN. We will distinguish between the two primary visual states—Collapsed and Expanded—and explain how this hierarchy allows you to create professional, scalable diagrams.
The Core Concept: The Compound Activity
At the heart of hierarchy in BPMN is the Sub-Process. A Sub-Process is a compound activity—a container that groups related tasks into a single logical unit. It acts as a bridge between high-level strategy and granular execution.
Sub-processes allow modelers to:
- Hide Complexity: When discussing high-level strategy, you can represent a complex series of events as a single black-box activity.
- Drill Down: When necessary, you can open the container to reveal the detailed logic, tasks, and events contained within.
Visualizing Hierarchy: Collapsed vs. Expanded
The most common source of confusion for beginners is the difference between a sub-process shown in its Collapsed state versus its Expanded state. Both represent the exact same underlying logic, but they serve different communicative purposes.
1. The Collapsed State (Summary View)
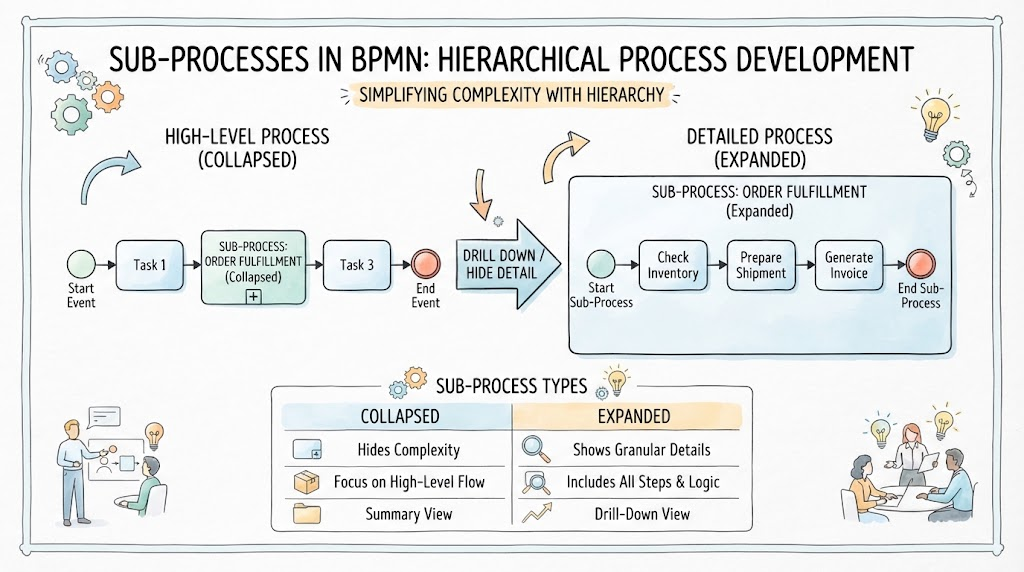
The Collapsed state is used for high-level overviews. In the diagram above, you will see a box labeled “SUB-PROCESS: ORDER FULFILLMENT” with a small plus sign (+) at the bottom.
- Visual Appearance: It appears as a single rectangle containing a title and a “plus” icon, indicating that details are hidden.
- Function: It hides the internal complexity. It focuses the viewer on the “High-Level Flow.”
- Use Case: Use this when you want to show the main milestones of a process without overwhelming the reader with details.
2. The Expanded State (Drill-Down View)
The Expanded state is used for detailed analysis and implementation. In our diagram, the “Drill Down / Hide Detail” arrow points from the collapsed box to a larger container revealing the internal mechanics.
- Visual Appearance: The container opens up, revealing specific tasks (e.g., “Check Inventory,” “Prepare Shipment”) and internal events (Start and End Sub-Process events).
- Function: It shows granular details and includes all steps and logic.
- Use Case: Use this when explaining exactly how a specific step is performed or when configuring technical systems.
Practical Walkthrough: The Order Fulfillment Example
To understand how this works in practice, let’s analyze the “Order Fulfillment” process depicted in the visual guide.
The High-Level Process (Collapsed)
Imagine a stakeholder looking at the overall order flow. They see a Start Event, followed by Task 1, then a Sub-Process: Order Fulfillment, followed by Task 3, and finally an End Event. To this observer, the internal workings of “Order Fulfillment” are irrelevant; they only care that the order moves from Task 1 to Task 3.
The Detailed Process (Expanded)
Now, imagine a warehouse manager needs to know what happens inside that box. They “drill down” into the sub-process. The view changes to show:
- Start Sub-Process: The trigger to begin the fulfillment logic.
- Check Inventory: A specific task to verify stock.
- Prepare Shipment: The physical packing task.
- Generate Invoice: The financial processing task.
- End Sub-Process: The completion of the internal logic.
Conclusion
Whether you are mapping a simple approval workflow or a complex financial transaction system, understanding how to utilize Collapsed and Expanded Sub-Processes is essential for creating professional diagrams. By mastering this hierarchy, you transform a chaotic list of tasks into a structured, readable, and maintainable business model.